
Basics of Git+GitHub
I have been asked on multiple occasions by different people for help or advice on how to use Git and GitHub to contribute to open-source software projects. Here I will attempt to provide a bare-bones example of the Git+GitHub workflow using the dorado GitHub repository. This 7-step guide assumes you have a GitHub account and have git available locally via a command-line interface. For more information on using git the documentation is really wonderful.
Step 1: Forking the repository
-
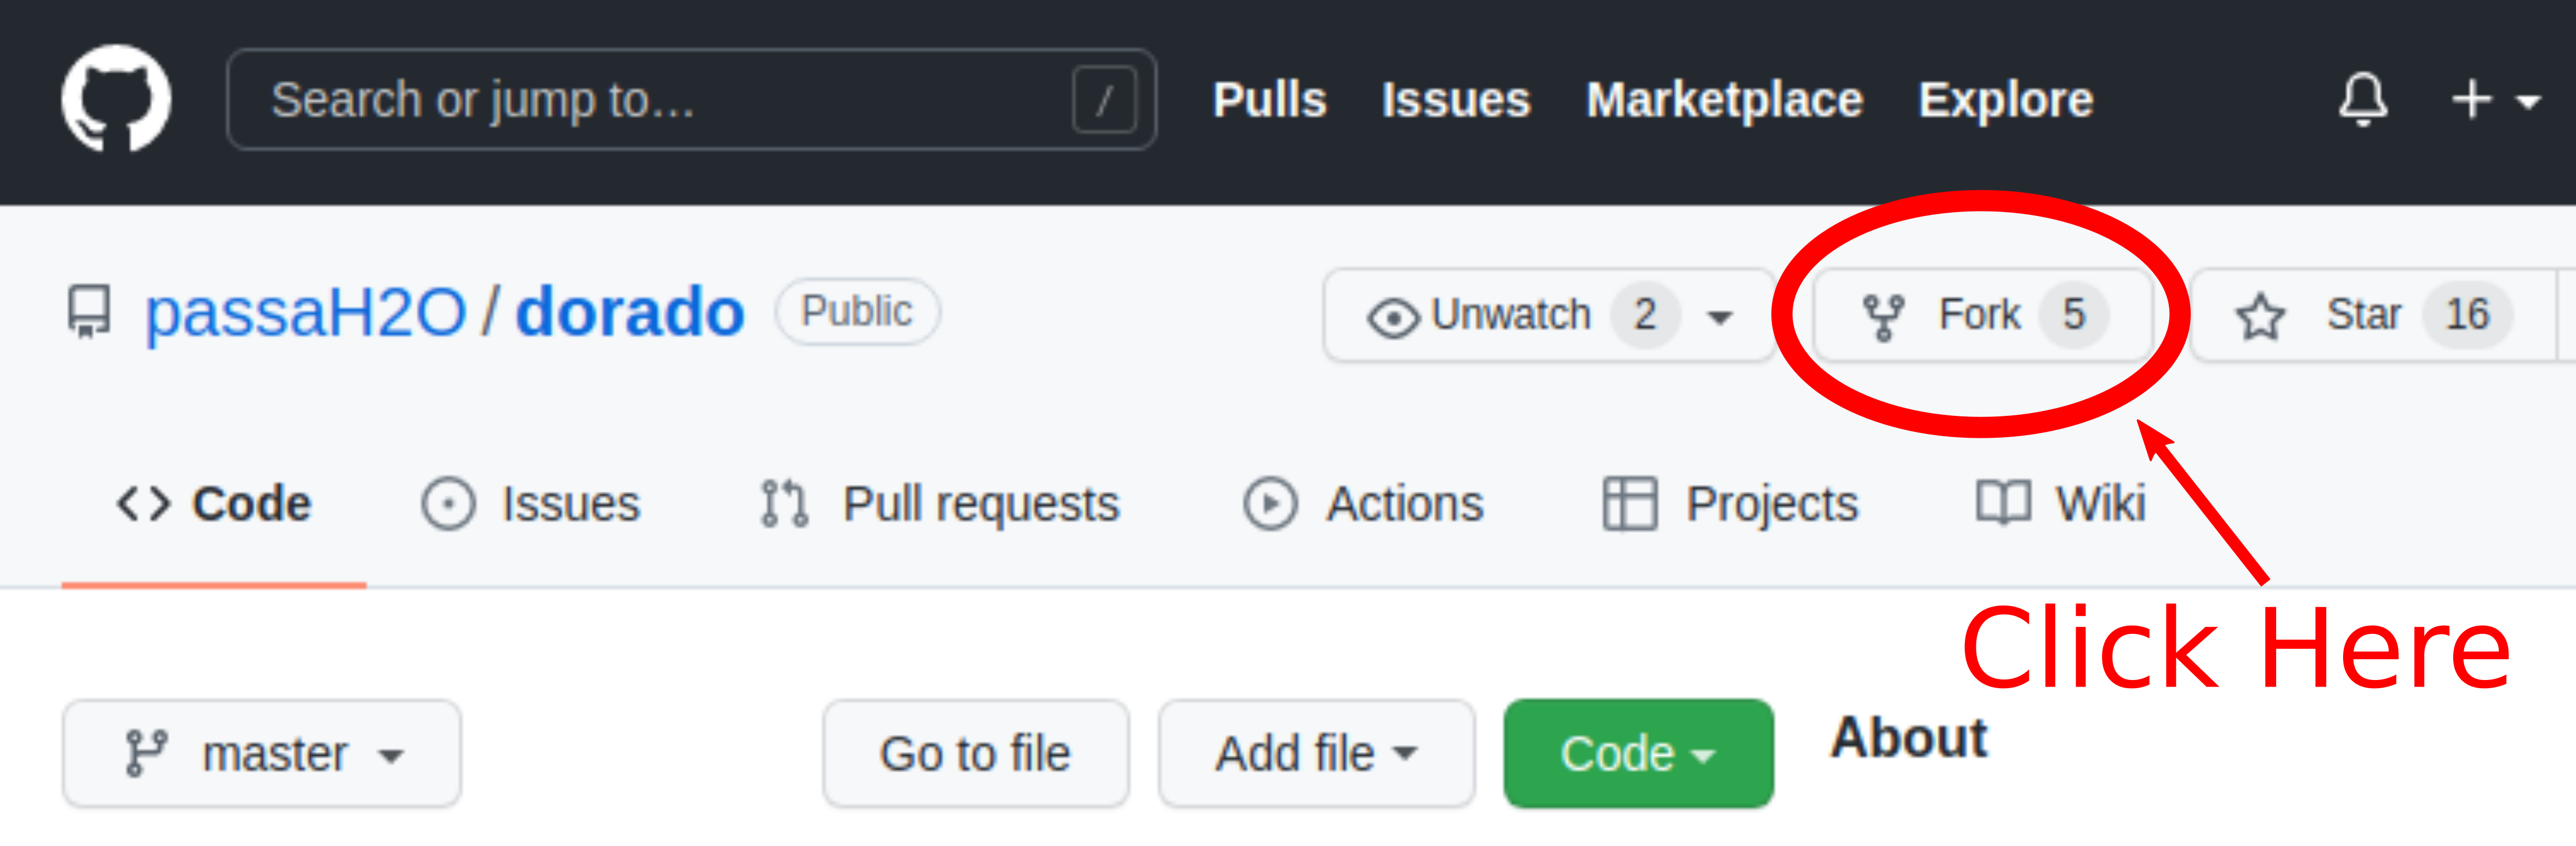
This step is performed on GitHub, it is not a true git operation, forking a repository creates a copy of it under your GitHub account, the purpose of doing so is to “own” a version of the repository on GitHub that you can upload new code to.
-
To fork a repository click the “fork” button on the upper right corner:
 |
|---|
| How to fork a repository. |
Step 2: Clone your forked repository to your local machine
-
This step is performed using git on your local machine.
-
The purpose of cloning (copying) a repository is to create a local version of the code on your computer that you can then modify.
-
The command to clone a repository is
git clonethen the URL to the repository you wish to clone. An example using your forked version of dorado is shown below; you’ll want to replace<your username>with your GitHub username.
$ git clone https://github.com/<your username>/dorado.git
- After cloning the repository, it is important to change your working
directory. So in this case you would type
cd doradointo the command line, the following steps assume your working directory is the newly cloned folder. To check your working directory, you can typepwdin the command-line.
Step 3: Create a local branch to develop new code on
-
In this step you define a local branch (think of this as a version of the repository) using git within which you will make your changes to the code
-
The purpose of doing this is to separate your new code and modifications from the stable “main” branch of the code (which is what you cloned in step 2).
-
The command to create a new branch is
git branchand then the name of the new feature you will be creating. An example is shown below where we create the branch “example”.
$ git branch example
Step 4: Checking out your new branch
-
In this step, you switch your development environment to the newly created branch from step 3. Once you’ve switched to this branch you can begin to make your modifications to the code.
-
The process of switching branches is referred to as “checking out”, similar to checking a book out of a library.
-
The command to checkout a branch is
git checkoutand then the name of the branch. If you are unsure what branch you are working in, you can typegit statusat any time to see. An example is shown below of checking out our new “example” branch.
$ git checkout example
-
Once this is done, you can go ahead and start making changes to the code, whether this is writing new code, modifying existing code, or deleting code.
-
If in the middle of your development you need to use the stable version of the code, you should commit your changes (step 5), and then checkout the main branch of the code using
git checkout main. This lets you avoid having tons of folders on your computer with various names “project_stable”, “project_dev1”, etc., and instead you can use git to switch between versions of a given project. -
Note: Steps 3 and 4 can be combined by modifying the checkout command as
git checkout -b example, this tells git to checkout a new branch called “example” effectively combining the process of making a new branch (step 3) and checking it out (step 4).
Step 5: Committing changes to your local branch
-
In this step you will “commit” the modifications you have made to the code.
-
This assumes you have made some changes. To see what has changed since you can type
git statusand new files, modified files, and deleted files will be listed. -
When you commit changes, you recording the changes you’ve made to git’s version control log. One of the benefits of using git in the first place is that you can track how the code base evolves over time, and you can also travel back in time to view the code base at any previous commit.
-
Before committing any code modifications, you need to let git know which modifications you would like to commit. To do this, you use the command,
git add <file name>. This “adds” the new, modified, or deleted file to the next commit. -
Once you have added 1 or more files to your commit, you get to use the command
git committo actually commit these changes to the version control log. I believe the simplest way to commit code is to call the commit command asgit commit -m "message", as git expects each commit to come with a message describing the changes made. An example of adding a new file and committing it is shown below.
$ git add newfile.txt

$ git commit -m 'added new file'
Step 6: Pushing changes on your local branch to GitHub
-
In this step, you “push” (transfer) the changes you just committed on your local branch up to your fork of the repository on GitHub.
-
This is when your newly modified code moves from your local machine to the GitHub platform.
-
This process is called “pushing” code, and to do this, the git command that is used is
git push. The first time you push code on a new branch, git will prompt you to name the “upstream branch”. That is because git does not know where on GitHub to send your local branch. In the command-line git should provide you with the syntax, but in case it does not, the syntax is below:
$ git push --set-upstream origin example
-
This process of using the
--set-upstreamflag is only needed the first time you push code to new branch. In this case,origindescribes the repository you are pushing to,originstands for the repository you cloned the code from.exampleis the name of the branch on GitHub, I think it is sensible to have this name match the name of the branch on your local machine (established in step 3). -
Future pushes are much simpler and are just
git push
Step 7: Opening a pull request (proposing your changes)
-
In this step you open what is called a “pull request” which is where you proposed to the original code owner that your new revisions be added to the “original” or “central” or “true” repository.
-
This step happens entirely on GitHub, remember, in step 6 you just pushed your modified code from your local computer up to GitHub. Now that version of the code lives on your fork, the purpose of opening the pull request is to eventually get the code from your fork “merged” (integrated) into the original repository.
-
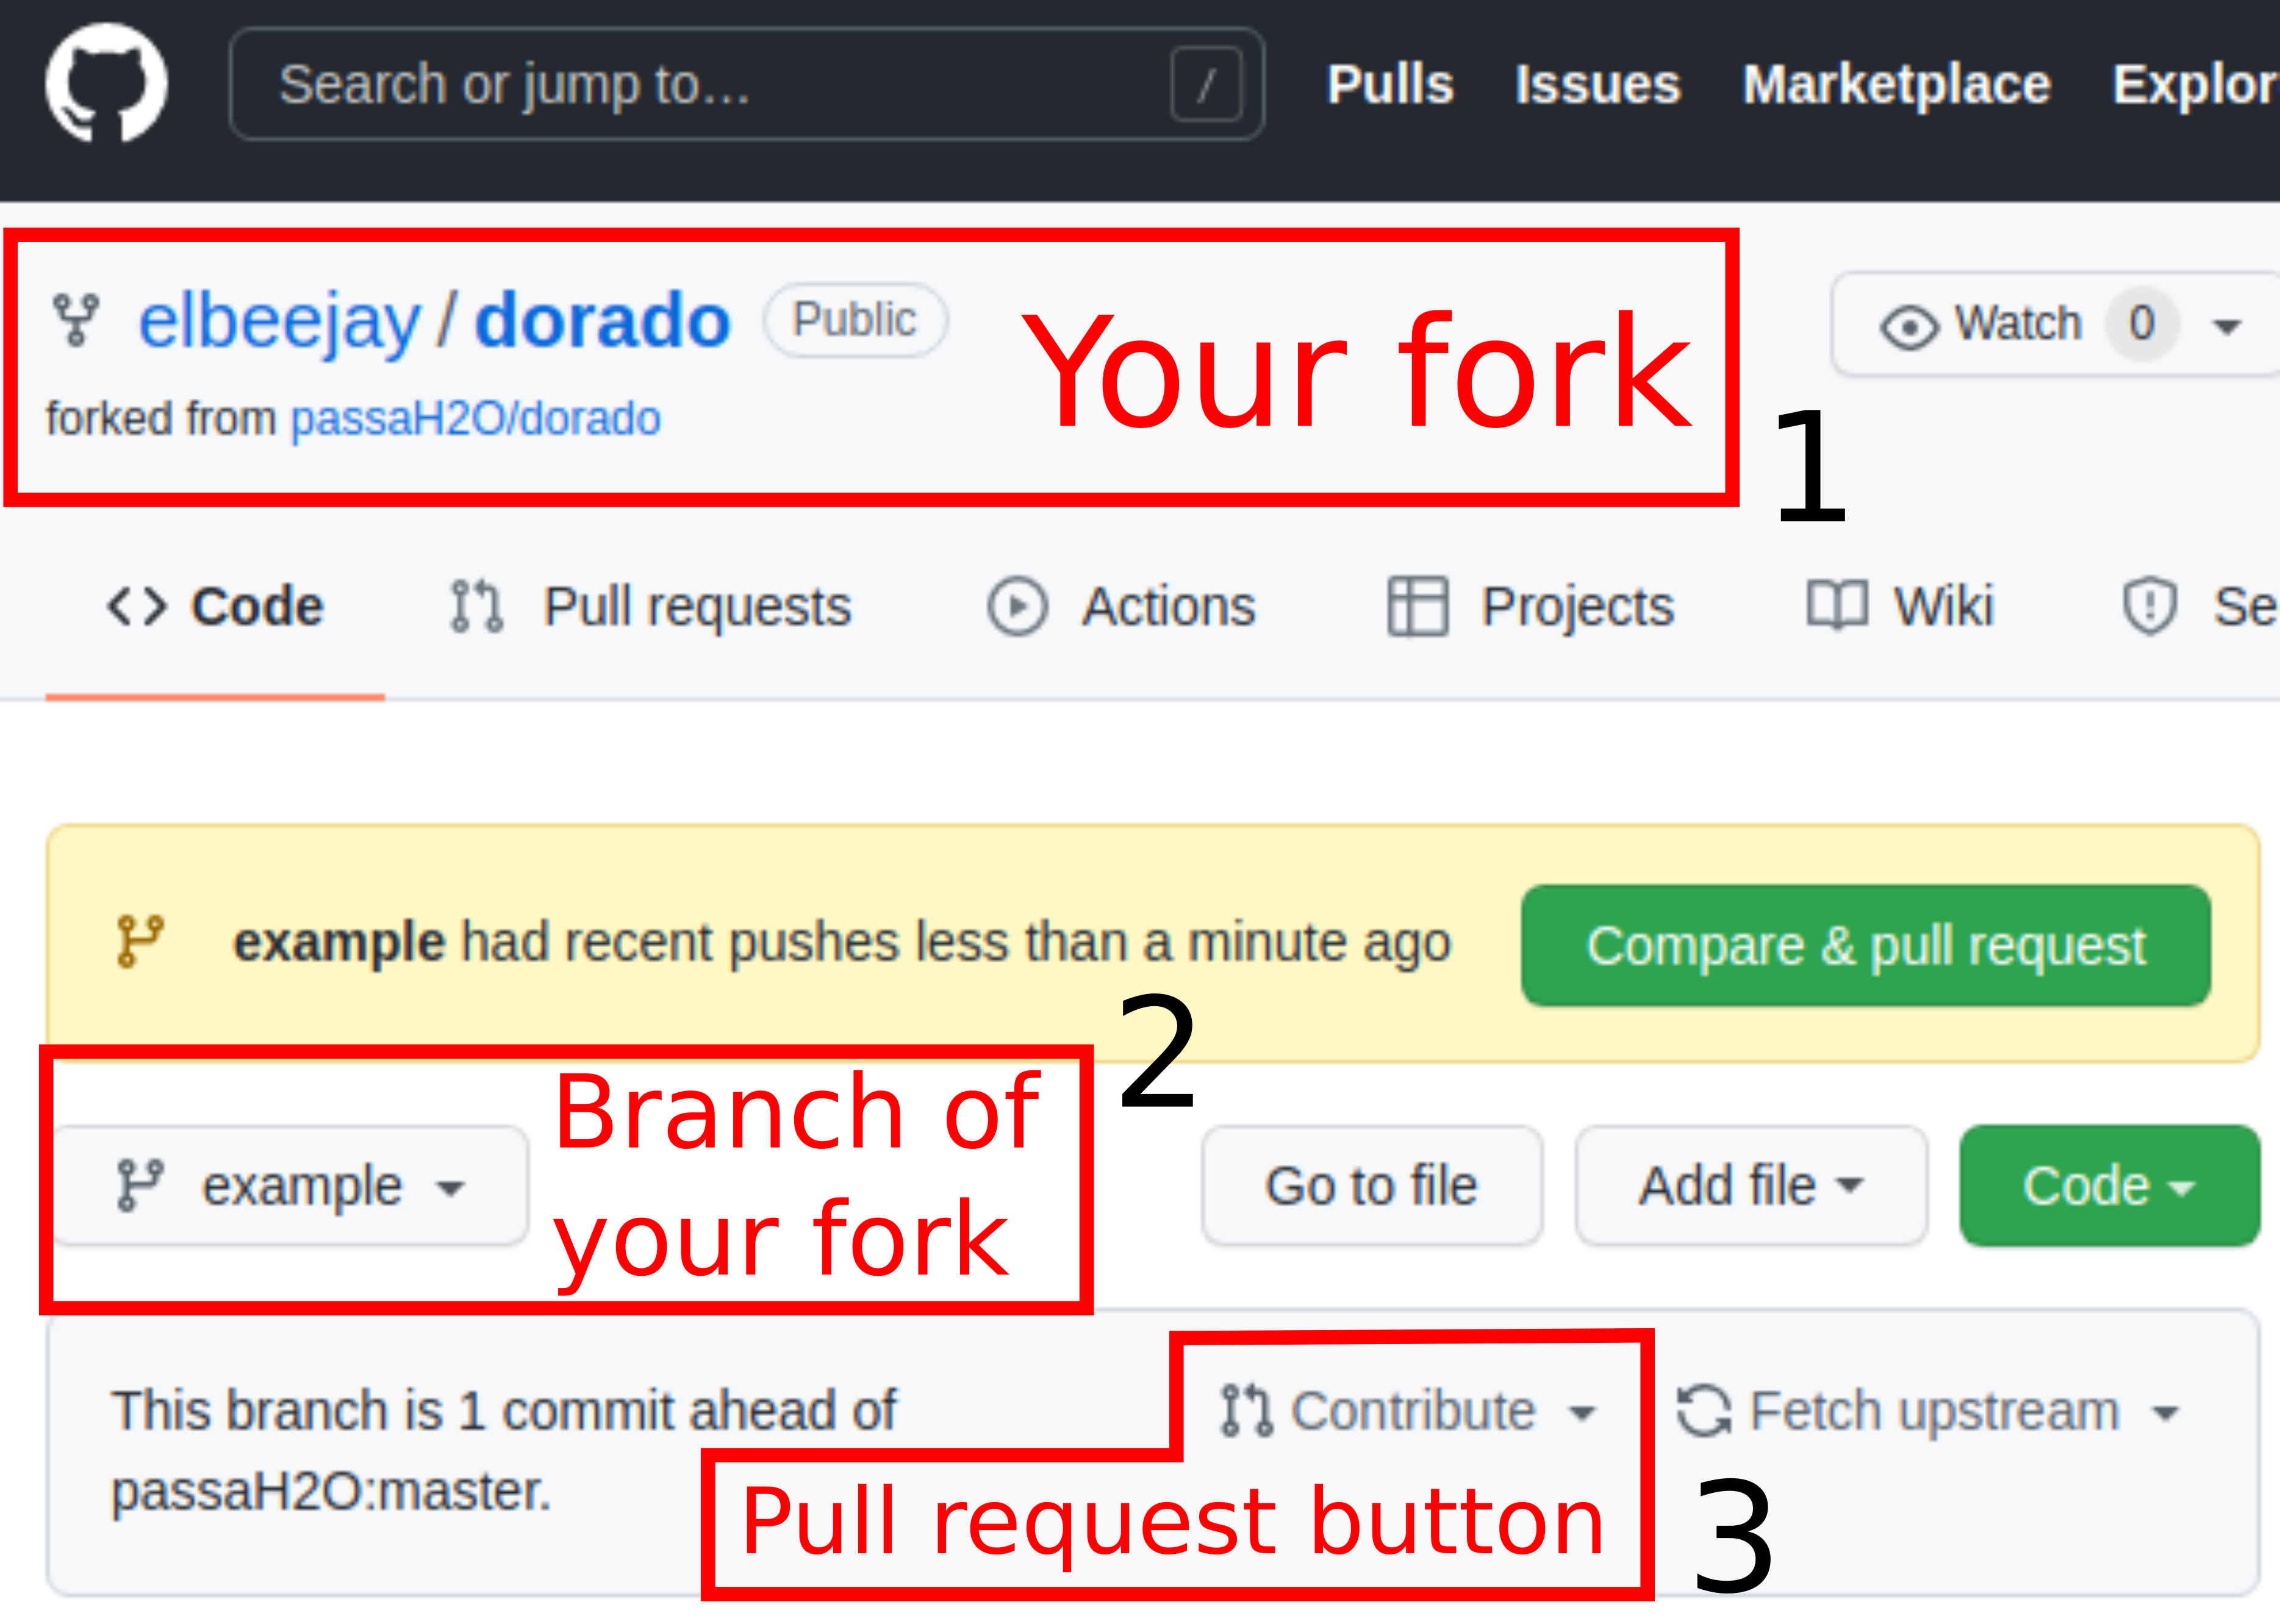
To open a pull request, first you should navigate to your fork on GitHub. Once you are on your fork (should say
<your username>/doradoin the upper left corner of the screen), you will want to navigate to the new branch you have created (“example” in our example). -
Then you will see a button to “Contribute”, this is where you click to open a pull request. Once the pull request interface opens you should write a small blurb about what your proposed changes are so that whoever reviews your code understands why you are suggesting these changes.
 |
|---|
| How to open a pull request: 1) Make sure you are within your fork on GitHub. 2) Navigate to the branch you have just pushed changes to. 3) Click “contribute” to open a pull request to the original repository. |
That’s it! There’s my quick 7-step guide to contributing to an open-source project using Git and GitHub. Some common git commands that you may wish to look up more information on include:
-
git remote: This command is needed to establish what are considered “remote” repositories on your local machine. “Remote” repositories simply refer to other GitHub forks, when you cloned your forked repository in step 2, this established a link between your local machine and your fork on GitHub. If you wanted to update your local code to reflect changes happening in the main repository, you need to create a “remote” connection to the main repository first. The main repository is commonly referred to as the “upstream” repository. -
git pull: This command lets you “pull” down code from any other git branch to your local branch. A common use for this is when some update has happened in the main code repository, and you wish to update the local copy on your computer. In this case, you would need to usegit pullto “pull” the updated code from GitHub and integrate it into your local copy. When you open a pull request on GitHub, you are effectively asking someone togit pullyour proposed changes into their code repository on GitHub. Using this command does that integration locally for you. -
git rebase: This is an alternative togit pulland is one way of integrating changes happening elsewhere in the project as you are developing new code on your own. When you usegit pullyou get a “merge commit” in the git history. Sometimes people want their development to look more seamless and want to minimize extraneous merge commits.git rebaseessentially takes the changes from some other branch, and then “replays” your new changes on top of those. This way it appears as if you simply wrote your changes after those other developments, avoiding a merge commit in the git history.